multimedia lecture board© University of Mannheim, University of Freiburg |
multimedia lecture board© University of Mannheim, University of Freiburg |
| Content |
|
| Prepare Talks |
Even though it is possible to prepare documents entirely with the mlb, it might be useful to do so with other applications (e.g., MS PowerPoint). Importing such documents into the mlb can be done via postscript, PDF, and image formats (gif, jpeg, ...). For PowerPoint we recommend to save the whole presentation as png's (i.e., PowerPoint creates a png for each slide). By importing each png, a mlb document can be created. The mlb document creator (mdc) automatizes this importing process. In order to find the correct sequence of the slides, all files need to be numbered serially, starting at 1. mdc [path] [first file] [orientation] [thumbnails] {[width] [height]}
For Linux, there is a similar tool, ps2mlb, that converts a postscript file into an mlb document. In our experience, ps2mlb achieves a very high quality. Here is how to use it ps2mlb [psfile] [pages] [rotate{degrees}] [thumbnails {0,1}]
Please note that postscript files created on windows machines often cause errors. If so, we recommend the use of the png image format when importing documents. Please have a look at the FAQ |
| Start mlb |
The mlb can be started on command line with the following parameters (all parameters
enclosed in [] are optional):
mlb [maddr/mport] [-t mttl] [-f file]
|
| Start mlb with SDR |
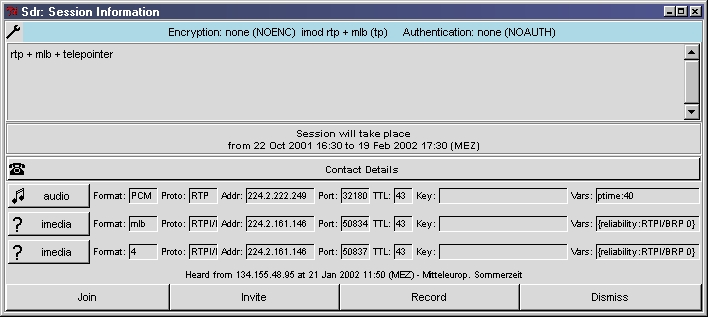
Alternatively, the mlb can be started via the multicast session directory (SDR) if
there exists a corresponding session entry within SDR (a short description how
to create session announcements can be found
here):
just click on the first "imedia" button.
For this to work, you have to execute the following two steps:
|
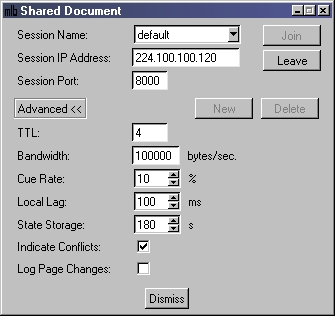
| Manage and Join Sessions | If the mlb was not started
via SDR or was started without command line options, the next step is to join
the actual shared session by selecting "Shared Session..." in the file
menu and entering the appropriate parameters (such as multicast IP address
and port of the shared session). By clicking on the "Join" button, your
mlb instance joins the shared session. In the "Participants" window (activated
via "View" menu) you will now see a list of all participants present in
the session. A newly started session is empty - add a page and start whiteboarding.
|
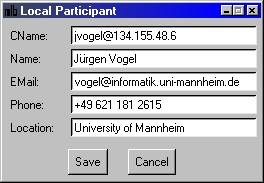
| Setup User | Local user information
can be entered via "Options" -> "User Profile". The cname is derived from
the login name and the IP address of the hosting computer and cannot be
changed. All data is stored in the file ".mlb_userprofile". Information
about remote users can be retrieved by double-clicking on a user in the
"Participants" window (activated via "View" menu).
|
| Manage Documents | At any particular point in
time, there can be at most one shared document, but more than one private one.
New documents can be loaded or created via the "File" menu. User actions
performed within the shared document are transmitted to all other participants,
whereas actions within a private document are visible only locally. If
you leave a shared session, the shared document is transformed into a private
document. Thus, you can switch shared sessions without losing
content.
The current version of the mlb supports late-joining participants. For a late joiner, this means that all content created before his joining the session will be available. But to reduce the initialization delay, only those (old) pages are requested that are active or become active at a later point in time.
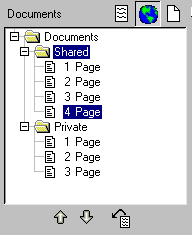
Documents (shared and private) consist of pages and chapters. The hierachy of documents is visible in the "Documents" window (activated via "View" menu), and you can reorganize the document structure via drag&drop operations: pick up a page or a chapter with the mouse (click and hold left button), and release object at the target position (release left mouse button). Drag&drop can also be used to transfer pages or folders between documents. If an object is transfered to the shared document, it is automatically transmitted to all other session participants (including all "child" objects such as the graphical objects on a page). By double-clicking on a page or chapter, you can change its name. The numbering of chapters and pages is generated automatically. The active page can be selected either by a mouse click on the "Documents" window, by using the arrow buttons, or by operating the arrow keys ("up" and "down"; "Home" jumps to the first page). With the help of the "import" button (rightmost button below the document tree) it is also possible to import the topmost silde from a private document into the shared document, which is useful when giving a presentation from a previously prepared and loaded document. Documents, including all annotations the local user has made, can be saved in an sgml format and loaded again at a later point in time (via "File" menu). Each document loaded is appended to the document hierachy as a new private document. |
| Adjust View | The user interface of the mlb can be adjusted to your specific needs via the "View" menu. Besides enabling and disabling parts of the mlb's interface such as toolbar, document tree, and participants list, the zoom factor for the slides can be selected either by manual definition ("Zoom...") or by choosing the optimum size in respect to the window size of the mlb ("Fit Page to Window"). If you want to hide all tools and use the maximum available screen space for displaying slides, use the "Fullscreen" mode. While in "Fullscreen" mode, annotations can be made as usual (unlike PowerPoint). You can return to the regular display mode by closing the fullscreen window. |
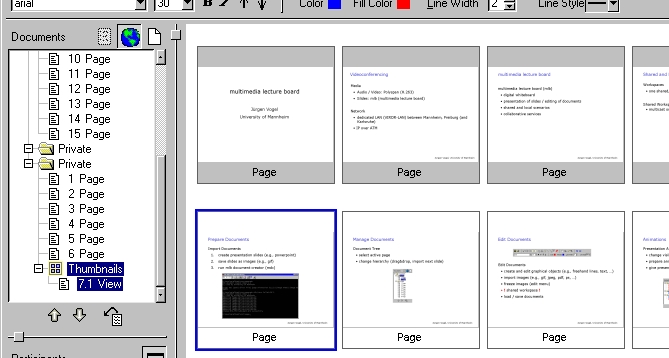
| Thumbnail Overview |
For easier navigation, a thumbnail overview of all slides of a private document can be generated
(menu "View"-> "Thumbnails"). The overview reflects the current state of all slides and can be
accessed via the "Thumbnail" folder in the document tree.
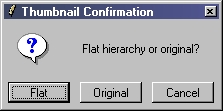
The thumbnails of the slides are displayed on pages that have the same size as the pages of the document. If there are more thumbnails that fit onto one page, the thumbnail folder will contain several pages. The thumbnail folder can be organized either in "flat" or "original" hierarchy. When choosing the "original" hierarchy, the thumbnail folder will contain subfolders that correspond to the subfolders present in the original document and the thumbnails will appear in the subfolders they are contained in. With "flat" hierarchy, the original structure of the document is lost and all thumbnails are displayed sequentially.
The thumbnail overview can be used to navigate within a document, either by using the "Arrow" keys and "Enter", or by double-clicking on a page. When importing a slide into the shared session, the corresponding thumbnail will be embedded in a grey box (see image above), and selecting the thumbnail will activate the appropriate page within the shared session. The thumbnails itself are not visible in the shared session, and a thumbnail overview can be created only for a private document. When saving a document, an existing thumbnail overview is stored, too. To save time during the actual session, we recommend to prepare thumbnail overviews in advance, e.g., using mdc. The thumbnail of a slides represents the state of the slide at the point in time the thumbnail was created. Any changes performed afterwards are not reflected. For an update, create the thumbnail overview once more. |
| Import / Export Documents |
If ghostscript is installed on your system, the mlb can import (via "File" menu) Postscript and PDF-files. Since we
rely on an external program, this feature of the mlb does not always work well. We recommend that
you test the import of a document offline. Some postscript dialects can be problematic, especially when created under
Windows (try the Apple LaserWriter driver). If an import fails, you have two options: (1) Convert
the document page per page to an image format with an external tool such as ImageMagick's
convert tool (available for Linux and Windows). Following, use mdc to generate a mlb document. With a
simple script (e.g., ps2mlb.tcl) this process can be automated. (2) Try to
repair the postscript file with the psutils (available for Linux).
All documents (shared or private) can be exported in various file and image formats. This function uses the zoom factor that is currently selected, meaning that the images have the same resolution they are displayed with. It is also possible to create an html-document containing all slides and a thumbnail-overview. When choosing html as export format, the mlb creates a new directory that contains all files needed for the html-presentation. Starting point is "index.html". |
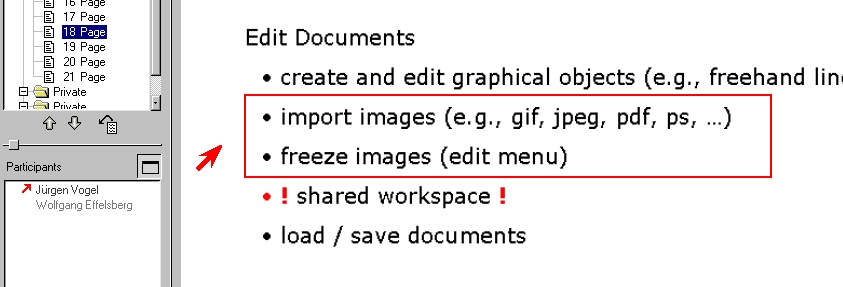
| Edit Documents | Create new pages either by
pressing the "New Page" button in the "Documents" window or by using
the "Edit" menu.
The active editing tool (e.g., draw freehand line, draw rectangle, ...) is selected in the toolbar, and the tool's properties (e.g., draw color, line size, font size, ...) in the attributes bar. Newly created objects are displayed on top of all other objects present on a certain page. If you want to change this display order, use the "Raise" and "Lower" buttons. If you select an object, it is possible to change its properties, move it, copy it, or delete it.
Most editing operations can be undone or redone, both in the shared and the private workspace. Normally, all local user actions performed within the shared document are transmitted to the other participants. To make private annotations within the shared workspace, activate the annotation mode (press annotation button in "Documents" window). Private annotations are visible only to the local user. As with the editing operations, page changes within the shared document are transmitted, too. If you want to browse through pages without disturbing other participants, deactivate the "Live Mode" button in the "Documents" window. Please note that if you are not in live mode, you will not be able to perform any editing operations. |
| Presentation Animations |
Similar to PowerPoint, mlb presentations can be structured with the help of presentation animations.
These allow to fade in and fade out graphical objects in a well-defined order. There are two modes,
one editing mode for creating new and editing exisiting animations, and a presentation mode for
giving the talk.
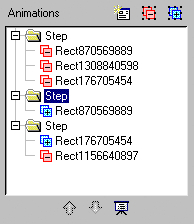
1. Prepare Animations Animations are subdivided into animation steps. A step holds all actions (fade in or out objects) to be performed together, meaning that a step is triggered by a single event (e.g., hit space bar). Activate the animations window by selecting "Animations" in the "Tools" menu. You are automatically in the editing mode. The animations window holds a list of all animation steps that are defined for the page currently displayed. Each step has a list of all actions to be performed. You can create new steps by pressing the "New Step" button (leftmost on top). Add an action to the activated step by selecting one or more objects and pressing either the blue "+" (fade in) or the red "-" (fade out) button. The object list of each step is composed of unique object identifiers. If you want to know which objects are referenced, select either a single object or a whole step of the animations list. Objects can be deleted from a step's list via the popup-menu (right mouse button). The same object can be used in different steps (e.g., fade out in first step, fade in fourth step, and fade out in fifth step), which allows very flexible animations. The ordering of steps within the animations list defines their execution order. If you want to change that order, steps can be rearranged by drag & drop. Animations are saved automatically if you store your mlb document, so that you can prepare your presentation in advance. 2. Give Presentation To give your presentation you have to switch into the presentation mode by pressing the "Presentation Mode" button (rightmost on bottom). The first animation step defined is executed automatically. Thus, the first step should hold a fade out action for each object you want to hide at the beginning of your animation. The respective next step can be triggered by hitting either the space bar, the (page) down keys, or by using the "up" and "down" buttons of the animation window. If there is no next step on the active page, the next page is displayed automatically. The presentation mode is left by pressing the "Presentation Mode" button once more. |
| Telepointer and Telebox | A telepointer creates
a common point of reference within a shared session and provides, basically,
a shared mouse pointer. It is used to visualize mouse movements by the
local user to remote participants, e.g., to highlight certain objects.
You can activate the telepointer by pressing the "Telepointer" button of the
toolbar.
The mlb allows each participant to have its own telepointer. To avoid confusion, it is advisable to choose different colors ("Options" -> "Telepointer" menu). Whenever a participant uses a telepointer, a telepointer icon in the correct color is displayed next to the participant's name in the participant list. For highlighting a whole region within the shared workspace, you can use the telebox that can be drawn by pressing and holding the right mouse button. The telebox is drawn in the same color as the telpointer.
|
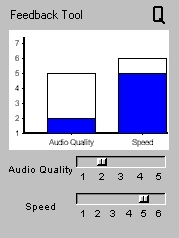
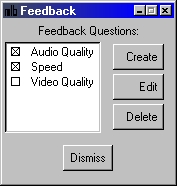
| Feedback | With the help of the
feedback tool you can evaluate certain parameters such as technical issues
(e.g., audio and video reception quality), but also parameters concerning
content and quality of the talk itself (e.g., if the talk is detailed enough).
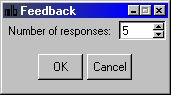
Activate the feedback tool via the "Tools" menu. To create, edit, and delete evaluation parameters, press the "Q" button in the "Feedback Tool" window. The "Feedback" window contains a list of all created questions. Select the visible parameters by clicking on the appropriate check box. If you want to create a new parameter, click the "Create" button and enter the number of possible answers. Next, you need to assign semantic meanings to the possible answer values. Participants can now give their vote by using the slider in the "Feedback Tool" window to select a value. The result of all votes is displayed as an average. Edit or delete parameters by selecting them from the list and clicking on the appropriate button.
|
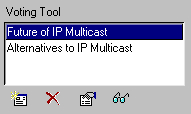
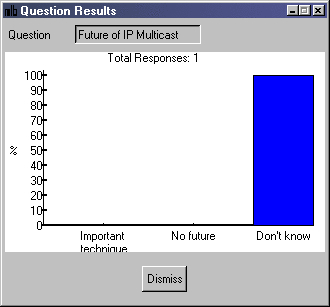
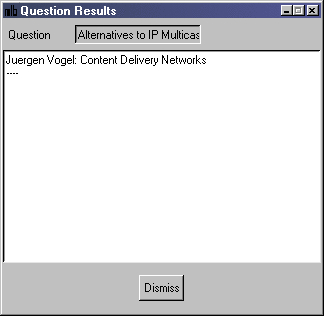
| Voting |
The voting tool allows you to survey opinions of the participants of a mlb session or to
place exercises and evaluate the results. Questions can either be multiple choice or
text (i.e., plain text answers) questions. There are two main difference to the feedback tool. First, text
questions are possible, and, second, results of multiple choice question are displayed in
more detail.
Open the voting tool window via the "Tools" menu. The voting window holds a list of all questions available. The following actions are possible (in the order of buttons from left to right): Create a new question (text or multiple choice), delete the selected question, give your own answer to the selected question, and view the results of the selected question.
|
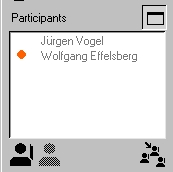
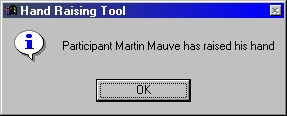
| Hand-Raising | In most videoconferencing
scenarios, the number of available audio and video channels is highly limited,
making direct collaboration among participants quite difficult. For example,
in a teleteaching session between two lecture rooms, it is nearly impossible
for the referee to notice the raised hand of a student in the remote lecture
room, especially if the audience is rather large and the displayed video
small. The hand-raising tool allows a controlled procedure in which a participant
raises his hand and the referee calls upon a certain person.
The hand-raising tool is integrated into the participants list ("View" menu). To raise your hand, press the "Raise Hand" button in the lower left corner. All participants having raised their hand are marked with a blinking orange dot next to their name. You can also have a popup-window notify you about the raised hand of a remote participant by activating the upper-right button. If you decide later on to withdraw your hand, press the "Lower Hand" button. A participant can be called upon by selecting his name from the raised-hand participant list and pressing the "Call" button. The participant called upon is notified by a popup-window. |
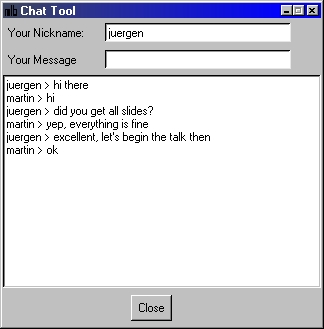
| Chat | For short discussions
(e.g., about technical issues of the session) it may be useful to fall
back on the chat tool. It can be activated via the "Tools" menu. Enter
your nickname and start typing your text messages.
|
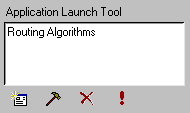
| Application Launch |
The application launch tool can be used to start external programs synchronously for all participants
of a mlb session. A lecturer, for instance, might want to show a java animation about routing
algorithms to clarify a certain slide.
Activate the application launch window via the "Tools" menu. The window contains a list with all applications prepared to be launched. The following actions are possible (buttons from left to right): Create a new application, edit the selected application, delete the selected application, and start the selected application at all sites. When creating a new application, the following fields have to be defined: "Name" is the display name of the application, "Executable" specifies the actual program binary, "Parameters" (optional) defines parameters the binary is to be called with, and "Local Path" gives the local directory path where the program is stored. While the first three paramters are equal for all participants, the local path has to be entered individually if the path of the application is different form the mlb path.
Please be aware that remote launch of applications is a security risk and that there are no mechanisms included to avoid the launch of evil programs. |
| Local Recording |
The mlb offers the possibility to record private sessions locally in the AOF
(Authoring On the Fly) format. In addition to the slides (including all annotations),
the audio of the referee is recorded as well. The AOF recording mechanism aims at the
production of offline courseware, to be published as a CD-ROM. A special
viewer is needed to replay recorded sessions. Activate the AOF tool under the "Tools" menu.
|
| Shared Recording |
The communication model of the mlb is based on RTP/I, an application-level protocol
for distributed interactive media (e.g., networked computer games, animations, and
shared whiteboards). To be more specific, RTP/I is a protocol framework
for the transmission of application data and the management of meta session data
such as participant information. The RTP/I framing captures information common
to all distributed interactive media. For instance, it distinguishes between
state and event ADUs (Application Data Units). Please refer to
RTP/I
for a more detailed description.
Thanks to RTP/I, it is possible to develop generic services applieable to all distributed interactive media that make use of RTP/I. An important example is the generic RTP/I recording service IMoD (Interactive Media on Demand), which is able to record and play back arbitrary RTP/I sessions in synchrony with RTP media streams (e.g., audio and video). |
| Client for Handheld Devices | We have implemented a mlb client for personal java running, for example, on Compaq iPAQ's. Via a client-server architecture called UCE (Ubiquitous Computing in Education) mobile clients can be connected wireless (Wavelan) to a mlb session. If you are eager to learn more, feel free to contact Juergen Vogel (vogel@informatik.uni-mannheim.de) or Nicolai Scheele (scheele@informatik.uni-mannheim.de). |
| Tips & Tricks |
|
| Contact | Please send your comments
and bug reports to:
Juergen Vogel (vogel@informatik.uni-mannheim.de) |